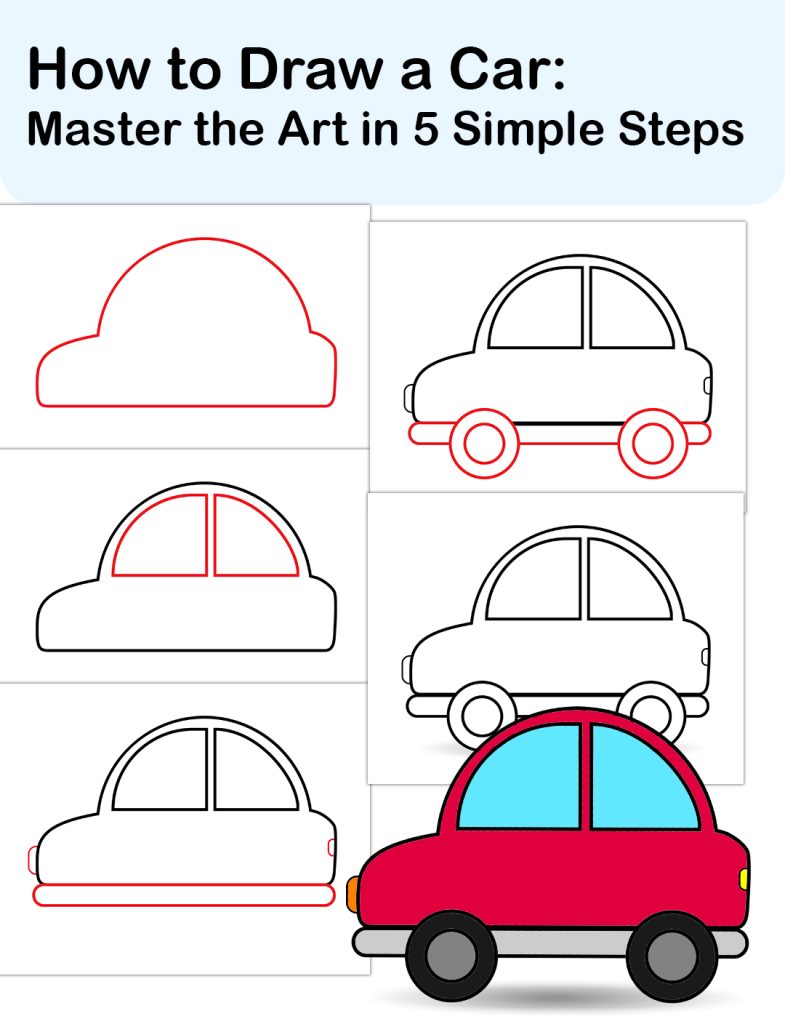
To draw a car, start with simple geometric shapes like rectangles and circles, then add details like wheels and windows. Use reference images for inspiration and practice regularly to improve your skills.
Drawing a car is a fun and rewarding activity for artists of all ages. Whether you’re a beginner or an experienced artist, creating a realistic and detailed car can be a satisfying accomplishment. With the right techniques and practice, you can learn how to draw a car that looks like it belongs on the road.
In this guide, we’ll explore the step-by-step process of drawing a car, from outlining basic shapes to adding intricate details. By following these tips and practicing regularly, you can develop your car drawing skills and create impressive artwork. Whether you’re drawing for personal enjoyment or professional projects, mastering the art of drawing a car can open up new creative possibilities.
Gathering Supplies
When learning how to draw a car, gathering the necessary supplies is the first step to success. To ensure your drawing is of high quality, you need the right paper and drawing tools. Let’s explore the essential supplies you’ll need to create a stunning car drawing.
Choose The Right Paper
Selecting the correct paper is crucial for achieving the best results in your car drawing. Opt for a smooth, heavyweight paper with a weight of at least 100lb to prevent buckling and allow for easy erasing. The recommended paper types include bristol board, drawing paper, or marker paper.
Select The Proper Drawing Tools
Using the appropriate drawing tools is essential for precision and detail in your car drawing. Consider investing in quality pencils such as HB, 2B, and 4B for sketching and shading. Additionally, mechanical pencils provide a consistent line width for outlining. To achieve various textures and tones, charcoal pencils or sticks can be beneficial. Fineliners and erasers are also essential tools for refining your car drawing with detailed lines and corrections. Lastly, blending stumps or tortillons aid in creating smooth gradients and blending pencil marks.
Understanding The Car Structure
Explore the fundamentals of car structure to master the art of drawing cars. Understanding the different components and proportions is crucial in creating an accurate representation. Pay attention to the body lines, wheels, and overall shape to bring your car drawings to life.
When it comes to drawing a car, understanding its structure is crucial. By analyzing the basic shapes and identifying proportions and symmetry, you can create a more accurate and realistic representation. In this section, we will explore these key aspects of the car structure to help you improve your drawing skills.
Analyze Basic Shapes
Before diving into the details, it is important to start with the basic shapes that make up the car’s overall structure. These shapes serve as the framework for your drawing and allow you to establish the correct proportions. Here are some common shapes you will find in most cars:
- Rectangle: Represents the main body of the car
- Oval: Depicts the wheels
- Circles: Indicate the headlights and taillights
- Trapezoid: Defines the windshield and rear window
By breaking down the car into these simple shapes, you can easily construct the initial structure of your drawing. Remember to adjust the size and position of these shapes based on the specific car model you are drawing.
Identify Proportions And Symmetry
Proportions and symmetry play a vital role in capturing the realistic appearance of a car. Pay close attention to the relationships between different parts of the car to ensure accuracy in your drawing. Here are some key points to keep in mind:
- Wheelbase: The distance between the front and rear wheels should be proportional to the overall length of the car.
- Height and Width: Consider the proportions of the car’s height and width to maintain its proper shape.
- Symmetry: A car is usually symmetrical, meaning the left and right sides should mirror each other. Ensure that the proportions and placement of details such as doors, windows, and wheels are consistent on both sides.
Observing and measuring these proportions accurately will greatly enhance the realism of your drawing. Take your time to compare and adjust the different parts until they are in harmony with one another.
Sketching The Car Framework
Before diving into the intricate details of drawing a car, it’s essential to establish a solid framework. The framework serves as the foundation for your drawing, helping you achieve accurate proportions and overall symmetry. With the right approach and a few simple steps, you’ll be well on your way to bringing your car to life on paper.
Start With Basic Lines And Shapes
Begin by sketching the basic lines and shapes that will form the outline of your car. Using a light pencil or a digital drawing tool, draw a rectangle to represent the car’s body. Next, add horizontal and vertical lines within the rectangle to indicate the central axis and general proportions of the car.
Remember to keep these initial lines light and flexible, as they will serve as reference points for the rest of your drawing. These basic lines will help ensure that your car maintains the correct proportions as you add details in the following steps.

Outline Major Features
Once you have established the basic framework, it’s time to outline the major features of the car. Identify and draw key elements such as the windows, tires, and doors, using simple shapes and lines. Pay close attention to the placement and size of these features, ensuring they align with the proportions defined by your initial framework.

As you outline these key features, keep in mind that you are creating a loose structure. This step is not about adding intricate details, but rather establishing a rough representation of the car’s significant elements. This will serve as a guide for the later stages of your drawing.
Remember, practice makes perfect when it comes to sketching the car framework. The more you familiarize yourself with the proportions and overall structure, the better your final drawing will look. Take your time, be patient, and embrace the creative process as you transform a blank canvas into a beautifully rendered car.
Adding Details And Depth
Now that you have mastered the basics of drawing a car, it’s time to take your car sketch to the next level by adding details and depth. By incorporating these elements, you can make your drawing look more realistic and visually appealing. In this section, we will explore two key techniques for adding details and depth: defining light and shadows, and incorporating texture and reflective surfaces. Let’s get started!

Define Light And Shadows
To give your car drawing a three-dimensional appearance, it’s essential to understand how light and shadows work. Light sources in the drawing determine where highlights and shadows will appear on the car’s surfaces. By carefully observing the direction and intensity of light, you can create a sense of depth. Here’s how you can define light and shadows:
- Identify the light source: Determine where the light is coming from in your drawing. Are you imagining the light coming from the left, right, or above?
- Highlight areas: Using a soft pencil or an eraser, carefully lighten the areas that are directly facing the light source. These areas will be your highlights.
- Create shadows: Next, darken the areas that are away from the light source. These areas will be your shadows.
- Blend the transitions: Use shading techniques to create smooth transitions between the highlighted areas, shadows, and the rest of the car’s surfaces.

Incorporate Texture And Reflective Surfaces
To make your car drawing look more realistic, it’s important to consider the textures and reflective surfaces present on the car. By incorporating these details, you can add depth and visual interest. Here are some tips to help you incorporate texture and reflective surfaces:
- Study the car’s materials: Observe the type of material used on different parts of the car, such as glass, metal, plastic, or rubber. Each material has a specific texture and reflects light differently.
- Add texture lines: Use light, gentle strokes to create texture lines that mimic the surface of each material. For example, use short, curved lines to indicate the shiny surface of a metal part.
- Render reflections: Reflective surfaces, like windows or shiny body parts, can add a wow factor to your drawing. Carefully observe the surroundings and draw the reflections accordingly.
- Keep it subtle: It’s important not to overdo the textures and reflections. Balance is key, so use your observation skills to maintain a consistent level of realism throughout the drawing.
By following these techniques, you can add dimension and realism to your car drawing. Remember to have fun and experiment with different styles and techniques. Happy drawing!
Refining The Drawing
Refining the drawing of a car involves paying attention to the smallest details, from the shape of the body to the placement of the wheels. By focusing on the proportions and incorporating shading techniques, you can bring your car drawing to life and give it a realistic look.
Remember to continuously refine and practice to enhance your drawing skills.
Drawing cars requires attention to detail and precision. Once you’ve sketched out the basic outline of your car, it’s time to refine the drawing and add those finishing touches that will bring it to life. In this section, we’ll explore two key aspects of refining the drawing: fine-tuning proportions and perspectives and adding final touches and enhancements.
Fine-tune Proportions And Perspectives
To make your car drawing look realistic, it’s important to ensure that the proportions and perspectives are accurate. Here are a few tips to help you achieve this:
- Compare and adjust: Take a step back and examine your drawing critically. Compare the size and placement of different elements with the reference image or real car. Make any necessary adjustments to achieve proper proportions.
- Pay attention to angles: Cars have various angles and curves, so be mindful of the perspective you’re trying to depict. Use your reference image to guide you in getting those angles right.
- Measurements matter: Take note of the measurements of different features like the size of the wheels, the distance between the headlights, or the length of the hood. These details can significantly impact the overall look of the car.
- Zoom in and out: Look at your drawing from a distance and up close. This will help you identify any inconsistencies or areas that need improvement.
- Refine details gradually: Start with the bigger elements of the car, such as the body shape and major features. Then gradually move onto smaller details like the windows, lights, and grille. This way, you can maintain a balanced and well-proportioned drawing.
Adding Final Touches And Enhancements
Once you’re satisfied with the proportions and perspectives of your car drawing, it’s time to add those final touches that will make it stand out. Here are a few ideas to consider:
- Shading and highlights: Add shading to create depth and dimension. Areas that are farther away from the light source should be darker, while areas that catch the light should be lighter.
- Texture and details: Use lines and shading techniques to add texture to different parts of the car. Add details such as door handles, side mirrors, or even reflections on the body to make your drawing more realistic.
- Color or grayscale: Decide whether you want to add color to your drawing or keep it in grayscale. Coloring can enhance the overall appeal of the car, but grayscale can also give a classic and timeless look.
- Experiment with different mediums: Try different art mediums like markers, colored pencils, or digital tools to add variety and experiment with different effects.
- Perfection through practice: Remember that practice makes perfect. The more you draw cars, the better you’ll become at refining your drawings and adding those special touches that make them truly exceptional.
By fine-tuning the proportions and perspectives of your car drawing and adding final touches and enhancements, you can elevate your artwork to the next level. Keep practicing and experimenting, and soon you’ll be able to create stunning car drawings that capture the essence of these impressive machines.
Frequently Asked Questions For How To Draw A Car
How Do You Draw A Car?
To draw a car, start by sketching a rectangular shape for the body. Add wheels and connect them with a base for the chassis. Then, draw details like headlights, windows, and doors. Use shading to give your drawing depth and add color to bring it to life.
What Are The Basic Car Shapes?
The basic car shapes include a rectangular body for sedans, compact cars, and SUVs. Sports cars have a more streamlined and aerodynamic shape with curved lines. Trucks and vans have a boxy shape with a flatbed or cargo area.
What Materials Do I Need For Drawing A Car?
To draw a car, you will need some basic materials such as paper, pencil, eraser, and colored pencils or markers. You can also use a ruler or a compass to draw straight lines or perfect circles for more precise details.
Conclusion
Learning how to draw a car is an exciting and gratifying experience for all aspiring artists. By following the step-by-step instructions provided in this blog post, you can develop your skills and create impressive car drawings. Remember to practice regularly, experiment with different techniques, and have fun during the process.
With patience and determination, you will soon be able to draw cars with confidence and precision. Happy drawing!