Spider Life Cycle Craft Activity Worksheets

Description
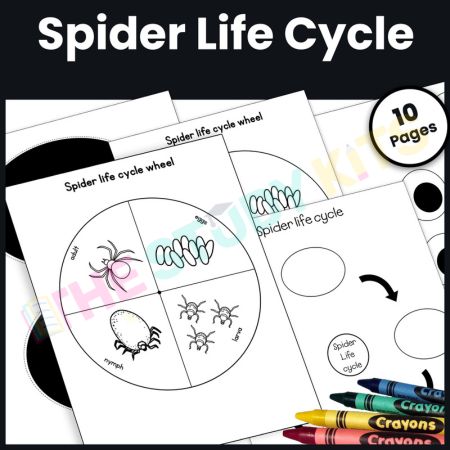
Title: Spider Life Cycle Craft Activity Worksheets
Suitable For: Elementary and Middle School Students, Educators, Homeschoolers, Parents
Purpose: Engage students in interactive learning about the spider life cycle through creating a 3D spider model, fostering hands-on exploration of biological concepts.
Activity:
- Print and cut out the spider body and legs template on black construction paper or cardstock.
- Print and cut out the life cycle wheel template, life cycle label, and eyes on white construction paper or cardstock.
- Assemble the spider’s body by gluing the cephalothorax and abdomen together.
- Create realistic spider legs by folding each leg in an accordion-like manner and attaching four legs on each side of the spider.
- Punch a hole in the center of both the spider body and the life cycle wheel.
- Align the holes and secure the spider and life cycle wheel together using a small metal brad.
- Glue the “Life Cycle of a Spider” label and the spider’s eyes onto the front of the spider’s body.
- Cut out the provided spider life cycle picture and glue it onto the designated space on the worksheet.
Tools Needed:
- Black construction paper or cardstock
- White construction paper or cardstock
- Scissors
- Glue
- Hole punch or pointed tool
- Metal brad
Page Size: 8.5″x 11″ (Letter Size)
User Instruction:
- Print and cut out the spider body and legs template on black construction paper or cardstock.
- Print and cut out the life cycle wheel template, life cycle label, and eyes on white construction paper or cardstock.
- Assemble the spider’s body by gluing the cephalothorax and abdomen together.
- Create realistic spider legs by folding each leg in an accordion-like manner and attaching four legs on each side of the spider.
- Punch a hole in the center of both the spider body and the life cycle wheel.
- Align the holes and secure the spider and life cycle wheel together using a small metal brad.
- Glue the “Life Cycle of a Spider” label and the spider’s eyes onto the front of the spider’s body.
- Cut out the provided spider life cycle picture and glue it onto the designated space on the worksheet.
Reviews
×
Page: /


Reviews
By Laura Kenney on
I used this with my daughter last week, and she loved all the activities! The clip cards were her favorite!
Write a Review
Leave a reply Cancel reply