
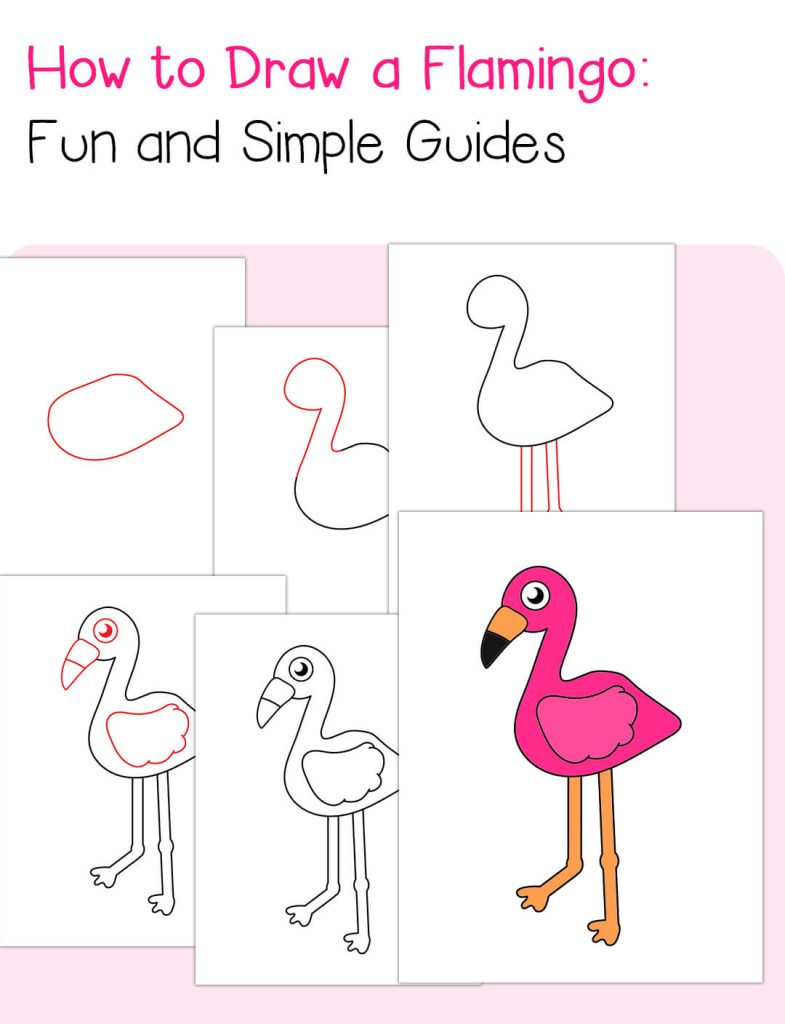
To draw a flamingo, start by sketching the basic outline of the body and neck. Next, add details like the beak, legs, and feathers, and then use vibrant colors to bring your drawing to life.
Are you ready to create your very own flamingo masterpiece? Drawing a flamingo may seem challenging, but with the right guidance, you can easily bring this graceful creature to life on paper. We will provide you with simple and easy-to-follow steps to create a beautiful flamingo drawing.
Whether you’re an experienced artist or just starting out, these tips will help you capture the elegance and charm of this iconic bird. So, grab your art supplies and let’s get started on creating a stunning flamingo drawing that will impress everyone who sees it.
1. Gathering Your Materials
When it comes to drawing a flamingo, gathering the right materials is the first step. Having the right tools at hand will make the drawing process easier and more enjoyable. Here are the essential materials you’ll need to get started.
1.1 Sketching Pencils
Sketching pencils are crucial for creating the initial outlines and shapes of the flamingo. Look for a set of drawing pencils, including varying degrees of hardness to achieve different line weights.
1.2 Erasers
Erasers are essential for correcting mistakes and refining details. A kneaded eraser is great for lifting graphite and charcoal, while a fine detail eraser can help clean up small areas.

1.3 Reference Images
Reference images are important for capturing the delicate details and proportions of a flamingo. Search for high-quality reference images of flamingos to use as a guide for your drawing.
2. Understanding Flamingo Anatomy
Before attempting to draw a flamingo, it’s important to develop an understanding of its anatomy. By studying the body shape, neck and beak, and leg structure, you can accurately capture the essence of this majestic bird in your artwork.
2.1 Study The Body Shape
Begin by examining the distinctive body shape of a flamingo. Focus on the elongated neck, slender body, and distinctive curvature of the legs. Use simple shapes such as ovals and lines to sketch the basic form, paying attention to proportions and positioning.
2.2 Observe The Neck And Beak
The neck and beak are defining features of a flamingo’s appearance. Take note of the graceful S-curve of the neck and the tapered, curved shape of the beak. Emphasize these features in your drawing, ensuring they are accurately represented to convey the bird’s natural elegance.
2.3 Note The Leg Structure
When drawing a flamingo, the leg structure is crucial to capturing its characteristic stance. Observe the long, slender legs and distinctive joint placement. Pay attention to the angles at which the legs are positioned, as this will greatly influence the overall pose of your flamingo drawing.
3. Sketching The Basic Outline
Now that you have the reference image in front of you, let’s start sketching the basic outline of the flamingo. This stage sets the foundation for the rest of the drawing, so pay attention to the proportions and shapes.
3.1 Start With The Body Shape
To begin, focus on drawing the body shape of the flamingo. Start by sketching a large oval shape for the body. Keep it loose and light, as you can adjust the shape later on. Remember, practice makes perfect, so don’t worry if it doesn’t turn out right the first time. Take your time and enjoy the process. Once you’re satisfied with the body shape, you can move on to the next step.

3.2 Add The Neck And Head
Now it’s time to add the iconic long neck and elegant head of the flamingo. Begin with a curved line extending from the body, slightly angled upwards. This will represent the neck. Next, at the top of the curved line, sketch a small oval shape for the head. Make sure the proportions are correct by referring back to your reference image. The neck and head should form a graceful S-shape. Take your time to refine and adjust the shapes until you are happy with the result.

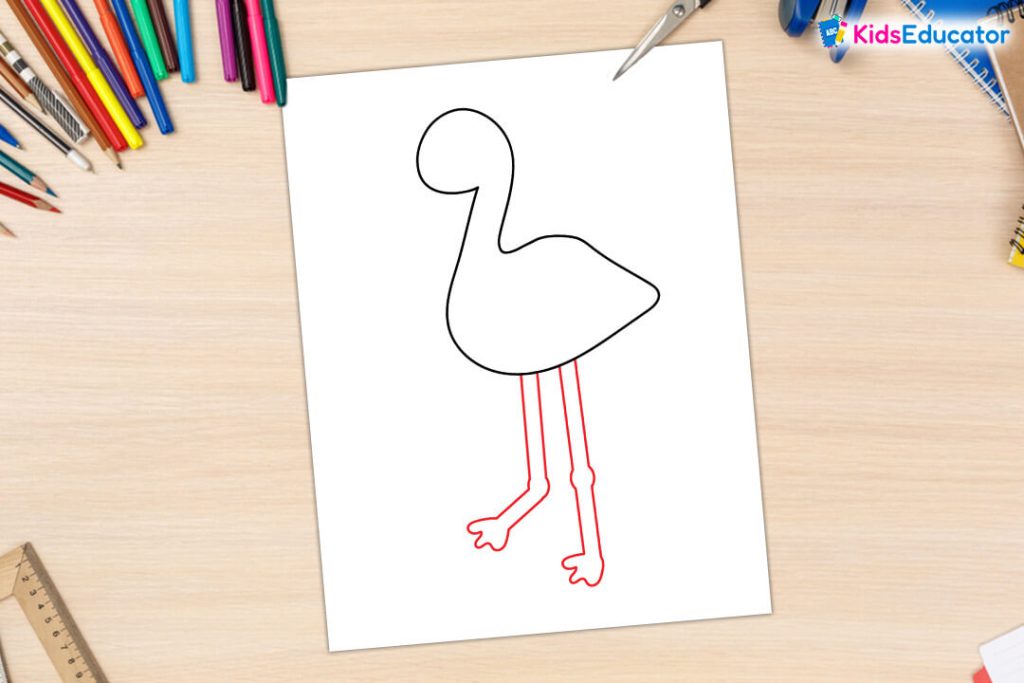
3.3 Define The Legs
To bring your flamingo to life, it’s important to define the legs accurately. Flamingos have long, slender legs that support their graceful bodies. Start by drawing two slim lines extending from the bottom of the body oval. These lines should be slightly angled towards each other to create the appearance of the flamingo standing. Then, at the bottom of each leg, sketch oval shapes for the feet. Flamingo feet are unique, with distinct joints and toes. Pay attention to these details to give your drawing a realistic touch. Once you have drawn the legs and feet, take a step back and assess the overall composition. Make any necessary adjustments to ensure the proportions are correct.
At this stage, you have successfully sketched the basic outline of a flamingo. The body, neck, head, legs, and feet are all in place. Next, we will dive into the exciting part – adding details and bringing your drawing to life!
4. Adding Details And Textures
In the previous steps, we covered the basics of sketching out the body shape and adding color to our flamingo masterpiece. Now, it’s time to take our drawing to the next level by adding intricate details and textures that will bring our flamingo to life! In this section, we will focus on three important aspects: feather texture, facial features, and skeletal structure. Let’s get started!
4.1 Feather Texture
Creating realistic feather texture can add depth and dimension to your flamingo drawing. Start by using short, curved lines to outline the individual feathers. Vary the length and direction of the lines to create a more natural look. Be sure to pay attention to the overall shape and contour of the feathers, as they contribute to the unique appearance of the flamingo. Once you have outlined the feathers, use light, flicking motions to add shading and texture, giving the feathers a soft and feathery illusion.
4.2 Facial Features
The face of a flamingo is what gives it its distinctive character. Begin by drawing a slender, curved beak using smooth, fluid lines. Make sure to emphasize the curve at the tip of the beak. Next, draw a small, almond-shaped eye on either side of the beak. Add a dot in the center for the pupil. To capture the expression of the flamingo, lightly sketch the eyebrow ridge just above the eye. Remember, the facial features should reflect the elegance and grace of this beautiful bird.
4.3 Skeletal Structure
Understanding the skeletal structure of a flamingo can greatly enhance the accuracy of your drawing. Start by sketching the long, slender neck, which curves gracefully and supports the head. Next, draw the body, paying attention to the distinctive S-shaped curve. Extend the leg down from the body, emphasizing the joint in the middle. Add the foot with its three toes, each ending in a delicate webbed shape. Take your time to ensure the proportions and positioning of each element are accurate, as the skeleton forms the foundation for the overall structure of the flamingo.

By adding these details and textures to your flamingo drawing, you can create a realistic and eye-catching representation of this elegant bird. Remember to take your time and pay attention to the unique characteristics that make the flamingo so distinctive. Don’t be afraid to experiment with different techniques and styles – after all, every artist’s interpretation is unique. So grab your pencil, and let your imagination soar as you bring your flamingo to life through these intricate details!
5. Adding Color And Shadows
Enhance your Flamingo drawing by adding vibrant colors and creating realistic shadows. By carefully blending the colors and using light and dark shades, you can bring your artwork to life, resulting in a stunning and visually engaging piece.

Now that you have mastered the basic outline of a flamingo, it’s time to bring it to life with vibrant colors and realistic shadows. Adding color and shadows to your drawing will make it pop off the page and give it a three-dimensional look.
5.1 Choosing A Color Palette
Choosing the right color palette is essential to create a lifelike flamingo. Flamingos are known for their beautiful pink plumage, so start by selecting various shades of pink. You can also experiment with other colors like orange, red, and white for the different parts of the flamingo.
Below is a table that can serve as a reference for choosing the specific colors:
| Body | Feathers | Beak | Legs |
|---|---|---|---|
| Pink shades | Pink, white, or shades of orange | Orange or shades of red | Pink, red, or shades of gray |
Feel free to be creative and explore different color combinations that appeal to you!
5.2 Applying Base Colors
To begin adding color to your flamingo, start by applying the base colors to each section. Use light, even strokes to fill in the shapes you have drawn. Start with the lightest shade of pink and gradually work your way towards darker shades. This will help create a smooth gradient effect on the feathers and body of the flamingo.
Remember to leave some areas white or use a lighter shade of pink to depict the highlights on the feathers, adding depth and dimension.
5.3 Adding Shadows And Highlights
Shadows and highlights are crucial elements to make your drawing look realistic. Shadows create the illusion of depth, while highlights add dimension and shine. To add shadows, use a darker shade of the base color or mix in some gray. Identify the areas where the light hits the flamingo the least and apply the shadow color there, typically under the body and wings.
For highlights, use a lighter shade or even white to depict areas where the light hits the flamingo the most, like the top of the head, beak, and feathers. This will create a contrast and make your drawing appear more three-dimensional.
Keep in mind that the positioning and intensity of shadows and highlights may vary depending on the light source in your drawing.
All said and done, adding color and shadows is the final touch that will transform your flat drawing into a vibrant and realistic flamingo masterpiece. So, grab your pencils, select the perfect color palette, and bring your flamingo to life with shades and shadows that make it truly stand out!
6. Final Touches And Refinements
Once you have completed the basic structure and shape of your flamingo drawing, it’s time to apply the final touches and refinements that will bring your artwork to life. These final steps will enhance the overall appearance of your flamingo and add depth and dimension to your artwork. Let’s take a closer look at each of these important finishing touches:
6.1 Reviewing Your Drawing
Before moving forward, take a moment to review your drawing. Look for any areas that might need adjustment or improvement. This step will help you identify any potential errors or imbalances that need to be corrected.
6.2 Smoothing Out Lines
When refining your drawing, pay attention to the lines. Smooth out any rough or jagged lines by adding gentle curves and strokes. This will give your flamingo a more polished and professional appearance. By refining the lines, you can make your drawing appear more fluid and dynamic.
6.3 Adding Depth And Dimension
To truly bring your flamingo drawing to life, focus on adding depth and dimension. Start by shading certain areas of your drawing to create the illusion of light and shadow. By adding darker tones in areas that would naturally be in shadow, you can make your flamingo appear more three-dimensional. Adding highlights to areas that would catch the light will further enhance the sense of depth in your artwork.
Remember, subtlety is key when adding depth and dimension. Gradually build up layers of shading and highlights, and regularly step back to assess your progress. The goal is to create a drawing that has depth and a realistic sense of dimension.
Frequently Asked Questions For How To Draw A Flamingo
How Do You Draw A Flamingo Step By Step?
To draw a flamingo, start by sketching the basic outline of its body using light pencil strokes. Then, add details like the long, curved neck and the wide, webbed feet. Use shades of pink and gray to color the body and add small feathers for a realistic effect.
Finish by emphasizing the eyes and beak for a final touch.
What Colors Are Flamingos?
Flamingos are known for their vibrant colors, including various shades of pink and red. These colors are a result of the pigments in the algae and crustaceans that the flamingos consume. The more pigments they consume, the brighter their coloration becomes.
It’s a fascinating biological adaptation!
Can You Draw A Flamingo With Other Materials, Besides Pencils?
Absolutely! While pencils are commonly used, you can draw a flamingo using a variety of materials. Experiment with watercolor paints, pastels, or even digital tools like tablets and graphic software. Each medium will offer its own unique style and effects, allowing you to express your creativity in different ways.
Conclusion
To sum up, drawing a flamingo is a fun and rewarding artistic endeavor. By following the simple steps outlined in this blog post, anyone can create a realistic and impressive depiction of this beautiful bird. Remember to start with basic shapes, focus on the details, and add vibrant colors to bring your flamingo to life.
With practice and patience, you’ll soon be able to capture the grace and elegance of these magnificent creatures. Let your creativity soar and enjoy the process of bringing a flamingo to life on paper.