To draw an octopus, start by sketching a large oval for the head and eight long, curved lines for the tentacles. Use reference images for accurate details and proportions.
Keep practicing to improve your drawing skills and create a realistic representation of an octopus. Drawing an octopus can be a fun and creative activity. Whether you’re an aspiring artist or just looking to try something new, learning to draw an octopus can be an enjoyable experience.
By following some simple steps and techniques, you can create an impressive depiction of this fascinating sea creature. In this guide, we’ll provide you with clear and concise instructions on how to draw an octopus, helping you to unleash your artistic abilities and bring this captivating creature to life on paper. So, grab your drawing supplies and let’s get started on this imaginative journey!
Choosing The Right Tools
When it comes to drawing an octopus, choosing the right tools is essential to bring your vision to life. The right tools can help you capture the intricate details and fluidity of this amazing creature. From pencil selection to paper quality, each tool plays a crucial role in the artistic process.
Pencil Selection
Choosing the right pencil is the first step in drawing an octopus. A set of graphite pencils ranging from 2H to 6B will provide the necessary range for sketching and shading. The harder pencils (2H to 2B) are ideal for outlining and initial sketching, while the softer pencils (4B to 6B) allow for darker shading and texture. When rendering intricate details, a sharpened mechanical pencil with a fine lead can be invaluable.
Paper Quality
Quality paper is crucial for achieving the desired results. When drawing an octopus, it is recommended to use heavyweight paper with a fine grain to withstand multiple layers of pencil work and erasing. The tooth of the paper should allow for smooth blending and layering of graphite. Acid-free paper is preferable to prevent yellowing and preserve your artwork for years to come.

Understanding The Basic Shapes
When it comes to drawing an octopus, it’s important to start with the basic shapes that form its structure. By breaking down the complex shape of an octopus into simpler components, you can begin to create a realistic representation of this fascinating creature. In this section, we will explore and understand the basic shapes used in drawing an octopus.
Circles And Ovals
One of the key shapes used in drawing an octopus is the circle. Circles form the basis for the head, body, and suckers of the octopus. To begin, draw a large circle for the head in the center of your drawing area. This will serve as the focal point of your octopus.
The body of the octopus can be represented by an elongated oval shape. Start at the bottom of the head circle and draw a slightly curved line extending downwards. Connect this line with a curved line that loops back into the head circle, creating a rounded shape. Remember, octopuses are flexible creatures, so feel free to experiment with different body shapes.
The arms or tentacles of the octopus are another set of elongated shapes. Each tentacle can be represented by a long, curved oval. Begin at the base of the body and extend the line outward, curving and tapering it towards the end. Repeat this process for the remaining tentacles, ensuring they are evenly spaced around the body.
Connecting The Shapes
Once you have drawn the basic shapes of the octopus, it’s time to connect them to form a coherent structure. Study the reference image or your visualization and carefully draw curved lines to connect the head, body, and tentacles. These lines will add depth and dimension to your drawing, giving the octopus a lifelike appearance.
To create the suction cups found on the tentacles, draw small circles at regular intervals along the length of each tentacle. These circles should be slightly larger at the base of the tentacle and gradually decrease in size towards the tip.
Remember to sketch lightly in the beginning, as you will be refining and adding details later on. This will make it easier to make adjustments and corrections as needed.
Step-by-step Drawing Process
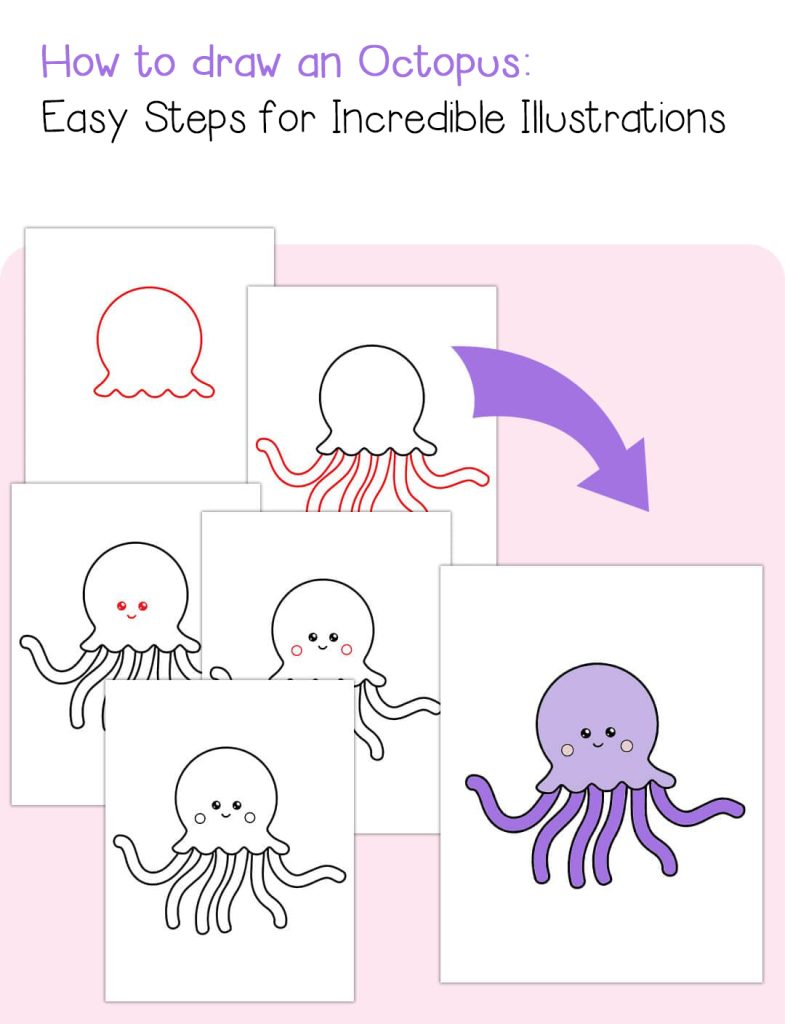
In this step-by-step guide, we will show you how to draw an octopus. By breaking down the drawing process into simple and easy-to-follow steps, even beginners can create wonderful octopus artwork. Let’s get started!
Drawing The Head
To begin, draw an oval shape to outline the head of the octopus. Make sure the oval is slightly elongated vertically to create a realistic proportion. Take your time, and use light strokes to ensure you can easily erase any mistakes.
Next, inside the oval, draw two large, circular eyes. These eyes will be the focal point of the octopus’s face, so make them big and expressive. Don’t forget to leave a spot of white in each eye to give it a spark of life.
Now, draw a small curve beneath the eyes to indicate the mouth of the octopus. You can make it smile, frown, or even give it a surprised expression, depending on the mood you want to convey in your drawing.
Lastly, add two small, semi-circular shapes on both sides of the head. These will be the octopus’s ears. Keep them simple and symmetrical, as they are just small details that add a bit of character to your artwork.

Adding Tentacles
Now that we have the head, it’s time to add the tentacles. Draw a long, curved line extending from the bottom of the oval shape. This will be the first tentacle. For a more dynamic look, you can make the line wavy or slightly twisted.
Next, draw a second tentacle on the opposite side of the first one. Keep it similar in length and shape, but add a few bends and curves to make it look natural. Remember, octopuses’ tentacles are flexible and can move in various directions.

Continue adding more tentacles by drawing three more curved lines on each side of the head. Make sure to vary the length and shape of each tentacle, as this will contribute to the overall appearance of the octopus.
Once you have drawn all the tentacles, go back and add small suction cups along the length of each tentacle. These suction cups can be indicated by drawing small circles or ovals evenly spaced. This detail will add texture and realism to your drawing.
Finally, erase any unnecessary guiding lines and darken the lines that you want to keep. You can also add shading or color to your drawing to make it even more vibrant and lifelike.
And there you have it – a complete step-by-step guide on how to draw an octopus. Remember, practice makes perfect, so keep trying and experimenting with different techniques. With time, you’ll be able to create stunning octopus drawings with ease!
Adding Details And Texture
Once you have sketched the basic outline of your octopus, it’s time to add the finer details and textures that will bring your drawing to life. From creating suction cups to enhancing depth, these techniques will help you achieve a more realistic and captivating octopus drawing.

Creating Suction Cups
The suction cups on the tentacles are defining traits of an octopus. To create realistic suction cups, start by drawing small circles along the length of each tentacle. Make sure the circles are larger near the base of the tentacle and gradually get smaller towards the tip. You can use a reference image or observe real octopus tentacles to get a feel for the placement and size of the suction cups.
Enhancing Depth
Adding depth to your drawing can make it more visually appealing. Start by shading the areas where shadows would naturally fall, such as the underside of the octopus’s body and the bottom parts of the tentacles. Gradually build up the shading using cross-hatching or stippling techniques to create depth and volume. Pay attention to the direction of the light source and vary the intensity of the shading accordingly to achieve a realistic effect.
Additionally, you can use a blending stump or a cotton swab to blend the shades and create smoother transitions between light and dark areas. This technique will further enhance the depth and give your drawing a more polished look.
Remember to practice these techniques on a separate sheet of paper before applying them to your final drawing. With patience and perseverance, you’ll be able to add details and textures that will make your octopus drawing truly come alive!

Adding Color And Final Touches
Add vibrant color to your octopus drawing, using a variety of shades and adding detailed touches for a lifelike finish. By focusing on color and fine details, you can bring your octopus drawing to life, creating a visually stunning and realistic masterpiece.

Now that you have mastered the foundations of drawing an octopus, it’s time to bring it to life by adding color and final touches. This step is where you can unleash your creativity and make your octopus truly unique. In this section, we will cover two essential aspects of adding color and final touches: selecting a color palette and incorporating shading. Let’s dive in!

Selecting Color Palette
Choosing the right color palette is crucial in making your octopus visually appealing. It sets the mood and enhances the overall effect of your artwork. When selecting colors for your octopus, consider the following tips:
- Use bright and vibrant colors to make your octopus stand out.
- Opt for colors that complement each other and create a harmonious blend.
- Experiment with different shades and tones to add depth and dimension.
Creating a visually pleasing color palette will make your octopus illustration visually engaging and captivating.
Incorporating Shading
Shading plays a vital role in giving your octopus a three-dimensional appearance and making it look more realistic. Follow these steps to incorporate shading effectively:
1. Determine the light source:
Identify the direction from which the light is coming. This will help you determine which areas of the octopus should be darker and which should be lighter.
2. Use a variety of shading techniques:
Experiment with techniques like cross-hatching, stippling, and blending to create different textures and shading effects. Each technique adds depth and dimension to your octopus drawing.
3. Gradually build up the shading:
Start by creating light areas and gradually build up the darker shades. This gradual transition creates a realistic and smooth shading effect.
By incorporating shading techniques carefully, you can transform your octopus drawing into a lifelike masterpiece.
Remember, adding color and final touches is the stage where you can truly let your creativity shine. Don’t be afraid to experiment with different colors and shading techniques to make your octopus drawing unique and eye-catching. Have fun and enjoy the process!
Frequently Asked Questions For How To Draw An Octopus
How Many Legs Does An Octopus Have?
An octopus has a total of eight legs, which are called tentacles. These tentacles are highly flexible and are used by the octopus for various activities, including catching prey, manipulating objects, and moving around.
Can Octopuses Change Their Color?
Yes, octopuses have the ability to change their color and even alter the pattern on their skin. They accomplish this by using special cells called chromatophores, which contain different pigments. By expanding or contracting these cells, an octopus can create a variety of color combinations for camouflage or communication purposes.
How Do Octopuses Breathe?
Octopuses breathe by drawing water into their body cavity and then across their gills, where oxygen is extracted. Unlike fish, octopuses do not have gills on the sides of their head. Instead, their gills are located inside their body, allowing them to move and breathe simultaneously.
Are Octopuses Intelligent?
Yes, octopuses are highly intelligent creatures. They have complex problem-solving skills, can learn through observation, and even exhibit curiosity. Octopuses are known for their ability to escape from enclosures and their remarkable camouflage techniques, making them one of the most intelligent sea creatures.
Conclusion
Mastering the art of drawing an octopus can be a rewarding and enjoyable experience. By following the step-by-step techniques outlined in this blog post, you can create a realistic and visually captivating representation of this fascinating creature. Whether you are a beginner or an experienced artist, honing your skills in drawing an octopus can bring out your creativity and artistic abilities.
So grab your pencils and paper, and let your imagination swim with these magnificent creatures. Happy drawing!